
The Google Cloud Functions is a great way to run your code without the need to manage a server and runtime environment. Thanks to Cloud Free Tier it is also free of charge up to 2 million calls monthly.
I will use Kotlin language because it is a good choice for backend services. It’s less verbose than Java and has faster compilation than Scala.
Initialise the project
To start you need to create a new folder on your computer for the project.
mkdir function-hello-world
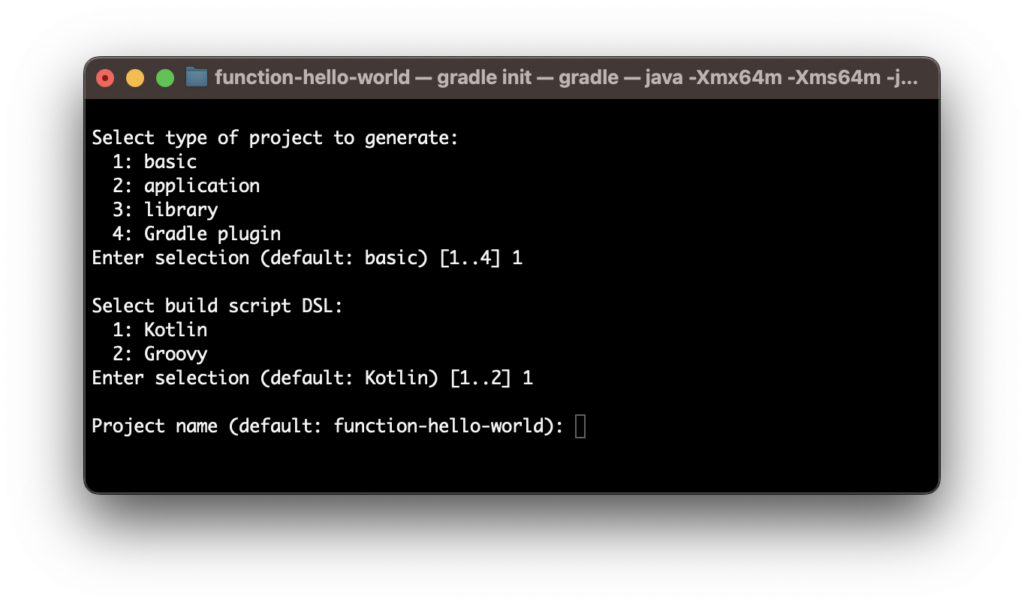
cd function-hello-world Then use gradle init to generate gradle project.
gradle init
Starting a Gradle Daemon, 1 busy Daemon could not be reused, use --status for details

Select type of project to generate:
  1: basic
  2: application
  3: library
  4: Gradle plugin
Enter selection (default: basic) [1..4] 1

Select build script DSL:
  1: Kotlin
  2: Groovy
Enter selection (default: Kotlin) [1..2] 1

Project name (default: function-hello-world):
Generate build using new APIs and behavior (some features may change in the next minor release)? (default: no) [yes, no] no

> Task :init
To learn more about Gradle by exploring our Samples at https://docs.gradle.org/8.4/samples
The basic project type is the best option to start with because it doesn’t create files you don’t gonna need. It also creates a single-module Gradle project and it’s the best choice for simple cloud functions. Of course, you can convert your project later on when it gets bigger.
I also recommend using Kotlin DSL for the build script because you use the same language for your code and build script.
Write the function
Now it’s time to open the project in your preferred IDE. You can start editing the project by adding the required plugins and dependencies to the build.gradle.kts file:
plugins {
    id("org.jetbrains.kotlin.jvm") version "1.9.21"
    `java-library`
}

group = "com.kamilhalicki"
version = "0.1.0-SNAPSHOT"

repositories {
    mavenCentral()
}

dependencies {
    implementation("com.google.cloud.functions:functions-framework-api:1.1.0")
}
After the changes, you can reload your gradle project in your IDE to download these dependencies.
Finally, you are ready to create your function. Just add a new Kotlin class and implement com.google.cloud.functions.HttpFunction interface. Remember to create it under src/main/kotlin directory.
package com.kamilhalicki

import com.google.cloud.functions.HttpFunction
import com.google.cloud.functions.HttpRequest
import com.google.cloud.functions.HttpResponse
import java.io.BufferedWriter
import java.net.HttpURLConnection

class HelloWorldFunction : HttpFunction {
    override fun service(request: HttpRequest, response: HttpResponse) {
        val writer: BufferedWriter = response.writer
        writer.write("Hello World!")
        writer.flush()
        writer.close()
        response.setStatusCode(HttpURLConnection.HTTP_OK)
    }
}
And that’s it. In the next article, I will show you how to properly build and deploy your function to the Cloud Functions.